Disclaimer: The procedures described herein should be performed only by or under the supervision of specialized technicians. LaserStar is not responsible for damage to parts, equipment, or persons attempting to perform any of these procedures without proper supervision or technical assistance, proper tools, or safety measures necessary for laser, high, and low voltage handling.
This procedure apply only for Lasers G1, G2 and G3
1. With the laser turned off, remove the top cover.
2. Turn on the laser and check if the Safety Shutter performs the self-test and if the LED lights up during the test.
-jpg.jpeg?width=360&height=480&name=20220204_084311%20-%20Copy%20(2)-jpg.jpeg)
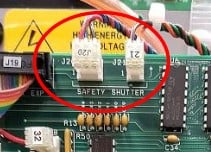
3. Check that the cables are correctly connected in the Safety Shutter and the
Safety Shutter PCB

4. On the Safety Shutter PCB, check that the cables are properly connected. With the laser off, try pulling on the red, blue, and black cables. If they are loose, tighten them with a flathead screwdriver. Also, check that the connection block is properly inserted into the PCB.

5. Check that J20 and J21 are correctly connected on the Control Board
6. If all the connections mentioned above are correct, you should replace the safety shutter, the safety shutter PCB, or the safety shutter cable.
Parts Numbers for Lasers G1, G2, and G3:
For Flash Lamp Systems: 101-00-1003 Assembly Safety Shutter
101-30-1002 Assembly Safety Shutter PCB
NOTE: The cable part number may vary by laser model. If it is a Laser Fiber Engine, contact service. If the Laser is a G4 or G5, please contact service
6. The problem may be the laser control board. Before ordering parts, contact the service department for further instructions on testing the control board.
You will need to contact LaserStar to order all three parts and discard them one at a time. Once you have determined which part you need, contact LaserStar for information on returning the unwanted parts.
Was This Article Helpful?
Take our survey and let us know your feedback.
Still Need Help?
If you need our assistance with your issue, please contact our customer support team at (1) 888-LST-SRVC (578-7782). If you're looking for support outside of our regular business hours, please leave a voice message or send an email to service@laserstar.net